Tuesday, October 23, 2012

What the Gonk?


Happy Halloween my nerdlings! After a month on hiatus, the Nerdess is back! I’m back just in time for my favorite holiday, Halloween! This month’s craft is going to be how to make a wallet accessory for everyone’s favorite hostess with the mostest…. assets. I’m talking about Elvira, the one and only Mistress of the Dark.  We are 
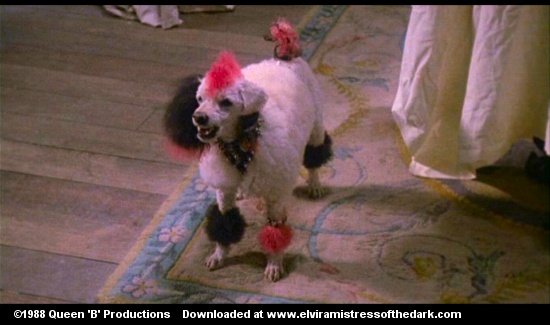
going to make this wallet look like Elvira’s familiar from Elvira: Mistress of the Dark, Algonquin (AKA Gonk). Gonk is a white poodle that Elvira gives a little makeover to. We are going to do the same thing to a plush poodle of your choice. I got a poodle that has light pink ears, so I had to reduce the color with my white paint pen. This didn’t work out so well, so I would advise you to get an all white poodle
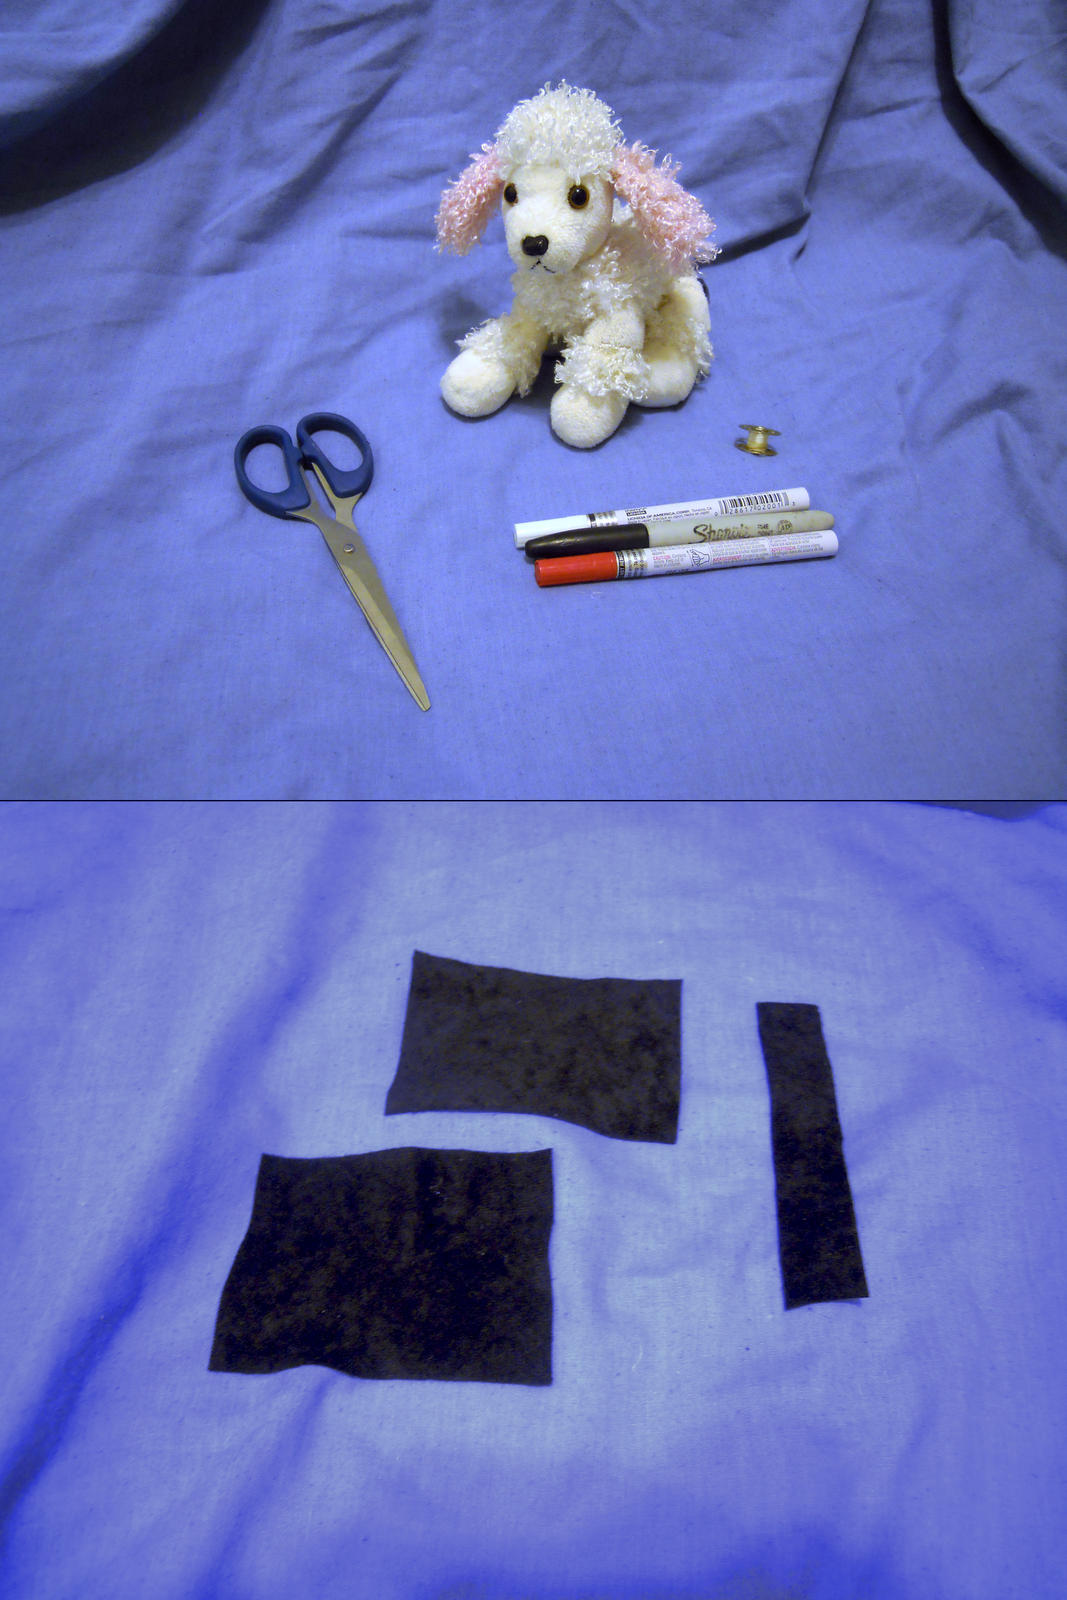

You will need:

1          6” White Plush Poodle  (I bought one made by Aurora World Inc. off of EBay)
1          Magenta Fabric Paint Pen
1          Black Fabric Paint Pen (or Sharpie)
2          3” x 4” Rectangles of fabric of your choice
1          1” x 6” strip of black fabric
1          Piece of ¼” ribbon (Just big enough for your button to fit through)
1          Button (or some sort of closure for your wallet)
5          Small spikes (I used a flat spacer bead and a crimp bead, but spikes would work out better)
1          Pair of scissors
1          Spool of white thread
1          Spool of black thread


First we are going to empty our little plush friend. Now carefully, using scissors or a seam ripper, split the seam on our buddy’s back. Once this is done, empty out the stuffing from the main body cavity only (leave the stuffing in the legs, head, and tail).


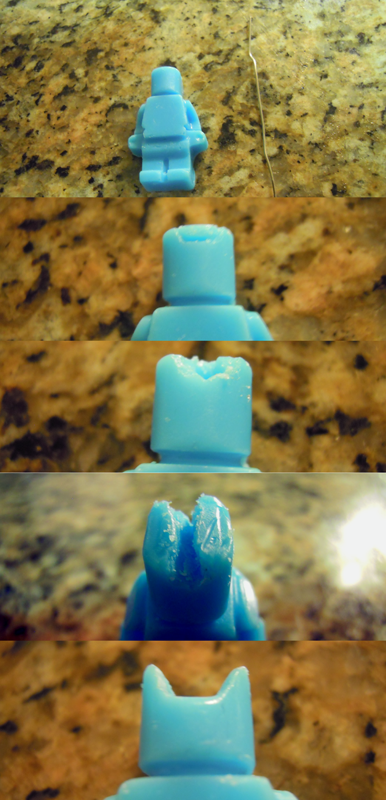
Now we need to give our little guy a haircut.  We are going to use our scissors to snip away most of the hair on Gonk’s left ear and some from both sides of  the center portion, to create a Mohawk.


After Gonk is all trimmed up, we will start to color his hair. I have a few color tips to help you:

1.     Hold each part you are working on away from the rest of the body until it is dry.  Due to the poodle being white, it is very easy to transfer paint on our little friend.

2.     You can use a red paint pen if you can’t find magenta. The red pen works with the white of the poodle and comes out looking fairly pink.

3.     The best option here would be to use the fabric pens, but if you don’t have any on hand or you can’t find any at the store, regular paint pens work fine for this project. The result with the paint pens will be slightly stiffer than with the fabric pens, but this poodle isn’t really for cuddling so I don’t think it matters that much.

Gonk’s right ear is going to be mostly black with a bit of pink at the bottom. The left ear, the shaved down ear, will remain mostly white with a bit of black at the bottom. The Mohawk is pink. The little poofs on the poodle’s legs will alternate. They will be pink on the left front and black on the right front. The back legs will be the opposite. The last part to color is the poof on the tail, which will be half pink and half black. Please see the image above as a guide.


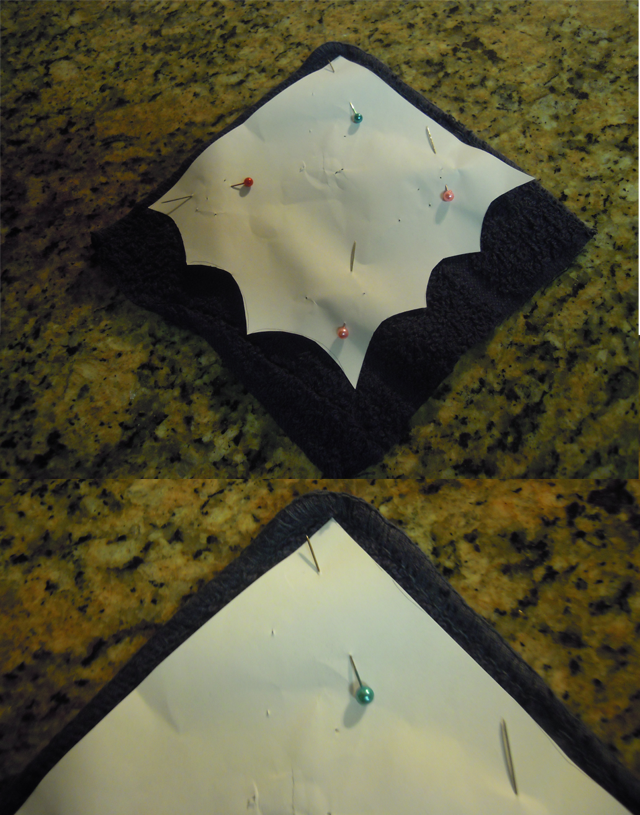
Now it’s time to make our lining for the inside of Gonk. Take the rectangles of fabric; mentioned in the materials list, and put them right sides together. Sew the two shorter sides and one long side, leaving the top open (see diagram above). Next fold the top edge over ¼”, right side facing out. This folded edge is going to be sewn to either side of the seam we cut into the poodle at the beginning.


Before you sew the pocket to your poodle you will want to pin it. For your button closure you will want to pin your small loop of ribbon at the top of the pocket in the center (see Diagram 1). I sewed the pocket in place with a simple backstitch, but if you have access to a sewing machine that would be preferred over hand stitching. I used white thread, so it would blend on the outside and be a decorative element on the inside. Just use whatever thread you feel would work well here. Now sew your pocket around the opening and then sew the button directly across from where you placed your loop.

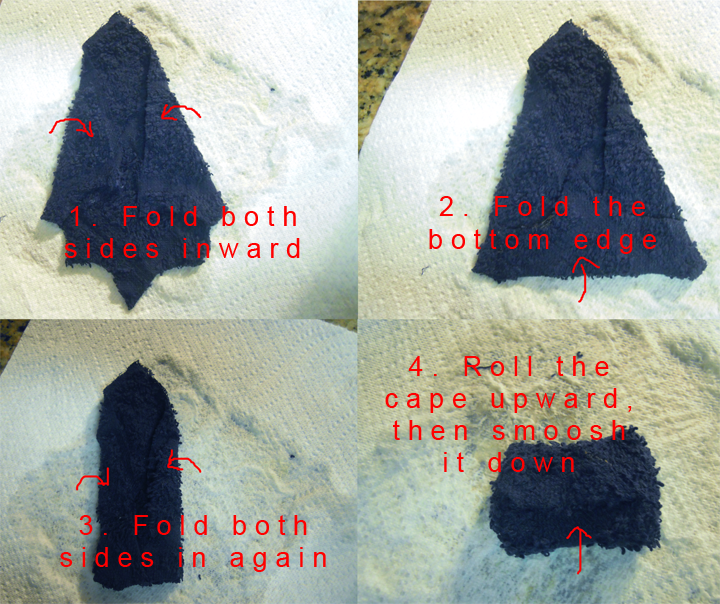
Gonk isn’t complete without a badass collar, so next we will take our 1” x 6” strip of fabric to make the collar. To start we want to add spikes, or something similar, to decorate the collar. I used 5 flat silver spacer beads and 5 crimp beads. I sewed one flat silver spacer bead with a crimp bead in front approximately every inch along the collar. Now we can wrap our collar around the poodle’s neck and pin it where it meets in the back. Next we sew the collar on the back of Gonk’s neck with black thread this time, so it isn’t very visible.


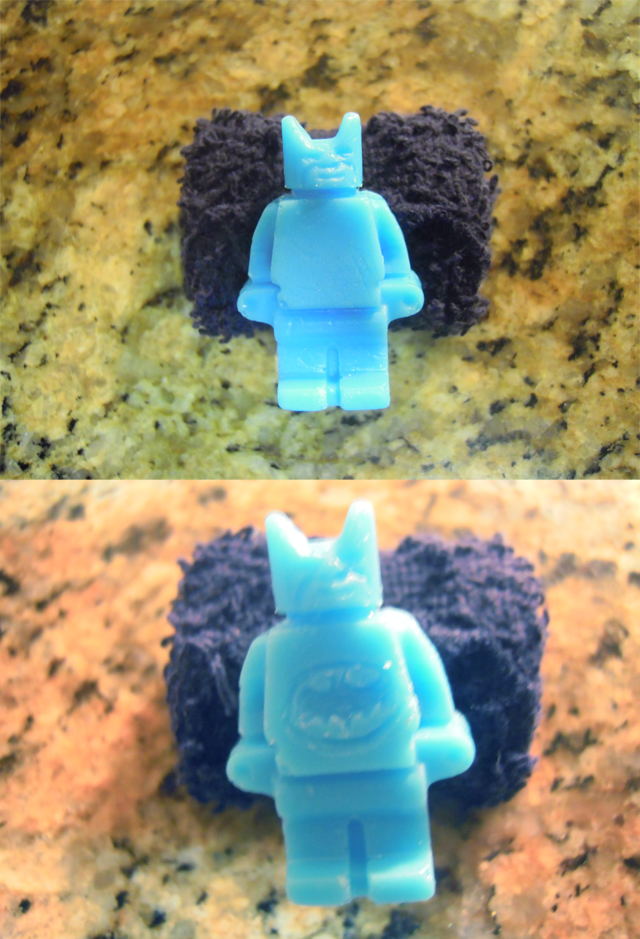
Tah-Dah! Now you have you very own mini Gonk for your Halloween festivities. This little guy will be perfect to hold cash and there may even be room for the luscious red Elvira lipstick you will be reapplying all night. 

Thank you for reading and please subscribe to my blog! Check back next month for my nerdy take on Thanksgiving! Unpleasant Nerd-Dreams!

The Crafty Nerdess

Tuesday, August 28, 2012

DUN NA NA NA NA NA BAT-MASKS!!!


Hello my fellow geeklings! This week I’m taking you through a very simple Bat-Mask craft. The supplies below will yield 8 masks.


You will need:

4          Black foam sheets
2          Pkgs of ¼ in. elastic
1          Stapler
1          Bat-Mask template
1          Pair of scissors

First you will need to print or draw your Bat-Mask template. I designed mine to look similar to Lego Batman’s cowl, but you can sketch out any cowl variation you would like.


Now that we have our template, we can prep our foam sheet. Since each mask is about 6-1/2 in. wide, the standard foam sheet should be able to yield at least 2 masks per sheet. I find it easier to cut the foam in half before I start tracing my stencil onto it. If you want to try to yield more masks per sheet, feel free to ignore this little step and just fit as many as you can on your sheet.


Once you have your foam sheet, trace the template with a blue ballpoint pen. This may sound like an odd choice, but I found that the ballpoint pens draw smoothly on the foam surface and the blue stands out just enough against the black of the foam. Now we want to cut the masks out following the template guidelines we just drew.

This next step is completely optional, but I decided to add a few accents on the masks to make them look less plain. You can do this by cutting out bits of contrasting foam, which is what I did, or by drawing the accents on with a paint pen. I think this just adds a little more character to our Bat-Masks.

Finally our Bat-Masks are ready for the elastic. You can attach the elastic any way you want, but the quickest and easiest way is to staple the elastic to the sides. You can also punch a hole in either side of the mask and tie the elastic through the holes, but this technique may be more likely to rip. With the stapler method, if the elastic breaks, you can just staple it back into place. If the elastic tears the hole you punched for the other method, it will be much harder to fix. Just a little tip for those of you who choose the hole punch method, buy some clear hole reinforcements (little clear circular stickers with holes in the center to reinforce punched holes in documents) to make your masks less likely to break. You can find these at your local office supply store.


Ta-da! Now we have fun Bat-Masks for our little Bat-party goers. Thank you for reading and I hope you come back next month for my newest craft.

Signing Off,

The Craft Nerdess


Friday, August 24, 2012

Holy Bat-Delay, Batman!!

Hello my fellow nerdlings! I apologize for the delay in this week's blog. I will be starting classes back up on Monday, so it has been prep, prep, prep for me this week. 

I will be returning on Tuesday with my last blog for this month, then I will be posting monthly instead of weekly. This new schedule will continue throughout the semester, but I hope you will all stick with me through these changes.

Tune in on Tuesday for a guide to making Lego Batman masks!

Signing Off,

The Crafty Nerdess

Wednesday, August 15, 2012

Bat-Bags Ahoy!


Hello Bat-friends and fiends! This week’s blog is going to be simple, but a decent amount of work will be involved. We will be working on Lego Batman party bags for our Lego loving guests.


To start you need:

1          12 pack of colored bags – You can find these at your local craft or party store
1          Pack of glue sticks
1          Box of snack sized plastic Ziploc bags
1          Pair of scissors
1          Pack of printer paper, to print your designs

Note: Quantities may vary depending of number of guests and the method you choose for this craft.


The overall idea of this project is very simple. The trying part is the prep work. Just dupe a few friends with scissors into coming over to help cut stuff; it will be like a party all by itself. We are going to start by finding a Lego Batman logo for the front of our bags. I designed my own, but there are a lot of Lego-izers out there, I even have an app that does it (see links at the end of the blog).  If you use a Lego-izer, just find the Batman logo you like best on Google, or the search engine of your choice. Put the logo you decided on through the Lego-izer, save, print, cutout, and then you have the Batman logo for our bags. You can glue the logo on with a glue stick or brush on a thin layer of white glue.


Now is the part where a lot more prep work is involved. We are going to cut out Lego pieces. I found some Lego pieces online, but I decided, again, to design my own. I’m kind of a picky Petunia when it comes to designs I am going to print out and use. You can print out the Legos I used from the image above. Once I printed the various Legos in different colors and sizes, I put them in a plastic baggy for each guest. You can sort the sizes and colors any way you want, but each guest should have enough Legos to spell out, at least, their first name.


Supply each party bag with a baggy of our paper Legos and a glue stick. The smaller kids may have trouble with the gluing, but if they are too small to glue the parents should be on hand to help out.  If all of your partygoers are tiny ones, then you can either write their names out with a pen as a template for them, or you can create each Lego name yourself. The easiest way to do this would be to use the “Lego” font (link below), then just print and glue the whole names on each bag.


I do not have these bags available in my store this week, but please e-mail me if you would like to commission the complete names comprised of Legos for each of your party guests. With the whole names you can just print, cut out the complete printed letters, and glue them on the bags, as with the methods mentioned above.

Whichever way you decide to go, this can be a cute craft or an adorable addition to your Lego Batman party.

Tune in next week for my next crafty idea. Same Nerdess-time, same Nerdess blog!

Signing Off,

The Crafty Nerdess

Related links:


Tuesday, August 7, 2012

To the Bat-Soap!!

All right True Believers, it’s time for the first official Crafty Nerdess blog. As I mentioned in my welcome post, I will be doing a weekly blog with nerdtastic craft projects and ideas. This month all my projects will be centered on Lego Batman. This is for two reasons:

1    Lego Batman is poorly represented in the marketplace. Yes, they sell the Legos all over, but the party supplies are scarce if not non-existent. You can find butt-loads of Lego Star Wars, Lego City, or Lego Harry Potter for gosh sakes! Alas, there is pretty much jack-diddly squat out there for Lego Batman fans.

2    Perhaps the more pertinent reason for my Lego Batman idea extravaganza is that my son turns 5 in September, and surprise, surprise, this kid wants a Lego Batman party.

I have been wracking my brain for ideas for the best Lego Batman party ever. From party favors to decorations, this will be one epic craft adventure. I wanted to tackle the party favors first.  I thought it would be absolutely adorable to have Batman and Lego shaped stuff throughout the party. To start things off I decided to make soap. Not just any soap, but Lego Batman shaped soap.

After hours of research, I just decided to go to my local crafts store and check out their “create your own soap” area. They didn’t have much in the way of variety in the soap base area, but they had a pretty decent selection of scents and dyes. Every store is different of course, but I found the soap making stuff by the modeling clay.  Once I had purchased a brick of soap base, my scent preference, and the dye that best fit my project, I was on my way to making soap!


To start you need:
1          Soap base – I used Life of the Party Essentials White Glycerin Soap
1          Soap Scent – I used Art Minds soap fragrance in Lavender
1          Soap Dye – I used Art Minds soap colorant in blue, because they didn’t have black at my craft store         
1          Pack of cellophane gift bags
1          Roll of ribbon of your choice
1          Lego Mini-Figure Shaped Mold – I found mine on Amazon
1          Logo block mold - optional
1          Microwave safe bowl
1          Cookie sheet or the like
1          Small paperclip
2          Black or blue washcloths

The first thing you are going to want to do is melt your soap base. You don’t need a lot of soap to start, but I used two vertical sections of my soap block. I followed the directions on the packaging. Mine said to melt the soap in the microwave on high for 40 seconds, then 10-second intervals until the soap is completely melted. I did 40 seconds and it was only about half melted. Now being the impatient little monkey I am, I decided to pop the soap back in there for another full 40 seconds. At this point it was mostly melted, so I just tossed it in for another 20 seconds to finish the job.

While the soap is still hot and melty, you will want to add your colorant  (AKA dye). The colorant suggests one drop at a time until color is achieved. This is all well and good if you have all day to stir this stuff, but your cooling time is limited. I wanted a dark blue, but since the soap is white already, I would have to use all the colorant to achieve that. I settled for a lighter blue. I started with 2 drops at a time and then increased to about five by the time I settled on the color.  Total I think I added 10-12 drops.  The scent suggests 5 drops per 1 oz. of base. I say drop those suckers in and stir until it is to your liking. These are fairly strong scents, so be careful not to go crazy with your oil pipette. Once the scent and color are to your liking, you may want to pop the soap in the microwave for about an additional 10 seconds, so we know the base is still good and melty for pouring.


Now that everything is mixed, it’s pouring time! Get out your molds, place them on your cookie sheet, and pour away. Try to be careful pouring, since the Lego shapes are small, it’s super easy to pour over. As you can see in the photo, I got a little over-zealous in a few areas. You may also notice that I have the Lego brick mold as well. I figured each kid could get a Batman and a Lego brick to stack him on top of. Lucky for me, Amazon has the mini-figure mold and the brick mold bundled together from one seller. 

Once your molds are filled, you can either leave them out to set or put them in the freezer to set. If you leave them out, they may take 20-40 minutes to set. If you put them in the freezer, you can cut that time in half.  One of the downsides to using the freezer is that they develop condensation all over, which makes them quite sticky and hard to work with. The other downside is that they are harder overall, so you have to let them thaw a bit in order to carve them in the next step. I think it’s better to just wait the 20-40 minutes, but do what works for you. After they set, pop them out of their molds. If you went a little pour crazy, that’s okay, because we can just cut the excess soap from around our figures with either our paperclip or your own fingernails.


Now we get to be really creative. It’s BAT EAR TIME! Depending on your preference of size, we need to sculpt the bat ears out of the top of our mini-figures’ head. We want to do this without making the head look freakishly small, but also make the ears tall and pointy enough so he doesn’t look like Catman. Start out by cutting off the little nub, or stud, on top of the mini-figure’s noggin. Now push the paperclip down slowly into the middle of Batman’s head, starting at the top, don’t go down too far. Now gradually shave away the middle without cutting into the ears on either side. It may be more comfortable for you if you sketch the shape you want slightly into the head with your paperclip, then proceed to shave the soap away. Whichever way you do it, just go slowly to avoid any major nerfs to the ears.


When our ears are in place, we will need to decide about the cape. The cape will be made out of washcloth material. You will need to buy a cheap pack of washcloths; your local dollar store is the best place to start. The quantity of washcloths will be based on the size of the cape and how many partygoers you have. Each mold makes 8 mini-figures, so I got 2 washcloths. I cut each washcloth into quarters. You can make your capes as big or as small as you want them. 


Next, you will want to make a template to follow for the edge of the cape. I just cut a piece of printer paper in a pattern to match ol’ Bats’ cape in his Lego form. Once you have the template you can cut the edge of your capes. Place the pattern on top of your quarter of washcloth and pin it in place. Align the template so that the top of the cape is surrounded by finished edges, the edges that are sewn. To avoid fraying, you can either run a thin layer of clear nail polish over the rough edges or sew a quick whipstitch/ blanket stitch. 


Now we want to wet the capes, and then fold them so they can fit into our party bags (See image above). Make sure they are thoroughly wrung-out before you fold them, then push out any extra water you can once they are in their folded form. The top of your washcloth-roll should be the top of the cape. Glue this piece of the cape to the mini-figure. The mini-figure and the washcloth must be completely dry for the gluing process. It may help the drying process of the washcloth if you place something heavy on top of the folded cape. I used a little bit of gel super glue across the back of our hero’s neck, then I lined the washcloth up to our little B-man and stuck it on. Now our Bat-soap tops off the favor perfectly.


At this point, you can call it a day or you can add facial features/Bat logo to your soap with your trusty paperclip. Now put your little Lego friends into their party bags, tie them up with a ribbon, and viola! Now we have the perfect party favor for our favorite Lego Batman fanatics. You may want to clearly mark that this item is not edible, unless you want some guests burping bubbles at your party. It could make for some interesting entertainment, but it’s not advisable.


I hope you all enjoyed this project. All crafts from my blog are available in my store, in case you don’t have the time for one of these DIY projects. Check back next week to see how to make Lego Batman party bags! Same Nerdess-time, same Nerdess-blog!

Signing Off,

The Crafty Nerdess


Note: The Bat-Soaps are not available in my store during the summer months, due to possible melting in transit.